Today's lesson was about handwriting analysis. :)
We were given 3 pieces of paper.
On the first piece of paper, we wrote a paragraph of words in our normal handwriting with our names labelled on it.
On the second piece of paper, we wrote the same paragraph of words in our normal handwriting WITHOUT labelling it with our names.
On the third piece of paper, we were to disguise our handwriting by writing the same paragraph more differently WITHOUT labelling it with out names.
Our teacher then swapped the second and third pieces of paper of our group with another group and see if they can match the disguised handwritings of each person to each piece of paper which has the undisguised handwriting. :)
It was a fun experience as we could get a deeper understanding of what our classmates' handwritings were like and i never actually noticed some of the small and significant details when they write certain characters.
We learnt that handwriting analysis is used in CSI to determine whether forgery has been committed or identify the author of writing samples. Forgery is most common on cheques and therefore, handwriting analysis will reveal any forgeries being made. Moreover, people have personal habits in their handwriting that make it unique. It is possible to disguise our handwriting but experts can still eventually tell if the characters/ words were written by the same person!
No two handwritings can be the same!
Handwritings are class characteristics.
*What are class characteristics?*
Class characteristics are opposite of individualisation. The process of classification of evidence is a process of assigning it to these groups or categories. Members of a given class will share the same class characteristics, whereas evidence that can be individualised will possess characteristics that make it unique.
Class characteristics are not enough to individualise the sample or link it to one individual. Handwriting has distinctive class characters. For example: to write a capital A, two slanted lines meet at a point and are linked by a horizontal line about half way up, conversely, a Q involves a circular stroke. However, everyone writes letters in various ways, imparting individual characteristics. Almost every type of physical evidence can be classified in some way, but not all evidence can be individualised.
***
An investigator would request for a handwriting specimen to compare with the questionable document.
The collected writing are samples done before investigation and these include: applications, work documents, previous checks, etc!
We gained knowledge about the different characteristics for comparing handwriting.
1.) Line quality: do letters flow smoothly or written with very intent strokes?
2.) Spacing of words and letters + margins
3.) Ratio of height, width and size of letters: Are they consistent in all aspects?
4.) Lifting pen: Does author lift his or her pen to stop writing word/ start a new word?
5.) Connecting strokes: In what ways are the capital letters connected to lower-case letters?
6.) Unusual letter formation: Are any letters written with unusual slants/ angles?
7.) Pen pressure!
8.) Slant?
9.) Baseline habits! straight or uneven?
10.) Fancy writing habits? curls loops unique styles?
11.) Placement of diacritics: How does the author cross the t's or dot the i's.
AFTER THIS LESSON, i gained ALOT OF INTERESTING KNOWLEDGE. At first when i saw the title, i thought handwriting analysis would be about interpreting someone's personality and character just by looking at the handwriting. However, handwriting analysis in CSI and forensic science is MUCH more complicated, detailed and logical, allowing interpretations to be made sensibly and logically. :) -> helps to find out if there're any forgeries,etc!!!
Tuesday, 14 August 2012
Monday, 6 August 2012
8th CSI Lesson: BLOOD SPLATTER
This CSI lesson was another lesson about blood splatter. However, this time, we got to create our own crime scene using different liquids with different colours.
The toilet in our school has be transformed into a crime scene and we were given 5 different tubes of liquids with different colours. They were all in colours of pink, green, yellow, sky blue and cobalt blue. We were to make use of the blood splatter patterns and concepts we learnt in our previous lesson to create a crime scene and let our classmates analyse what exactly happened while the crime was taking place.
Firstly, we set up OUR group's crime scene near the sink and the mirror. This was the situation:
1.) A girl was in the toilet, standing in front of the mirror and sink grooming herself.
2.) She was oblivious to the fact that danger was lurking and a psycho killer was lurking around the corner.
3.) The psycho corner stepped into the toilet and started pacing towards her with a knife behind his back.
4.) The girl heard the guy's footsteps coming and she turns to her right and is shocked to see the guy.
5.) The guy advances towards her, whips out a knife from the back and slashes her from his right to his left in an upwards motion.
6.) Girl hurls body in the direction of the sink and mirror and kneels down on her knees due to immense pain, palms clutch onto wound due to great pain and then palms clutch onto the sink for support.
7.) Wound's blood smudges against the sink while girl kneels onto ground and thus smudges are created at the front of the sink.
8.) Wound's blood drips down tremendously causing a pool of blood to be gathered onto the ground.
9.) Slash blood splatter seen on sink and mirror.
Next, the OTHER group set up their crime scene and we were given the task to analyse the scene. This was what we came up with:
1.) Firstly, we think that the murderer grabbed the victim by the head and slammed her head into the wall, causing a big patch of blood to be formed on the wall, with blood dripping down to the ground.
2.) Then, the murderer grabbed the victim by the head once more and slammer her head into the wall, causing another big patch of blood to be formed on the wall, with blood ALSO dripping down to the ground. (initially, we thought that there may be another person involved since the blood colours used for the 2 blood splatters are different (yellow and blue), however we could not find any possible explanation for the other blood splatters present which indicated that there were 2 people injured, thus, we scraped the idea that 2 people were involved in the crime.)
3.) Judging by the position of the two blood splatters (for the head slams), we conclude that the victim was probably a short and petite person (most likely a girl) because the height of the blood splatter for the head slams was at a low height from the ground, probably around 1.4m.
4.) The girl was semiconscious and thus fell down and sat on the floor with a pool of blood on the ground.
5.) There were a few smudges around the pool of blood, indicating that the girl attempted to stand up to escape/ fight back. Especially since from the front there were two smudges pointing outwards, which may be caused by the legs of the victim.
Then they revealed the actual scenario to us!
1.) The guy got raped by the girl and out of anger, violence, the guy grabs and slams the girl's head into the wall. He slams the girl's head once more creating two blood splatters.
2.) Girl becomes unconscious and falls to the ground, the pool of blood is gathered on the ground from the blood dripping from the wall.
Using the concepts we learnt, the angle and direction of impact, the height of impact of the blood, the velocity of the impact and surface of impact, we interpreted the whole situation and matched our analysis to the actual scenario. For our group, it was mainly involving the observation of the shape of the blood pool and the direction at which the blood flows to. There was also blood dripping on blood, which indicates excess bleeding and a serious injury being sustained-> head injury. The small little blood splatters around the big patch of blood on the wall also indicates that the impact was huge and thus the force exerted by the murdered when slamming the victim's head against the wall, was large too.
PHOTOS + VIDEOS:
These are videos of us re-enacting the scenes... May not be very scientific but just for entertainment :)
The toilet in our school has be transformed into a crime scene and we were given 5 different tubes of liquids with different colours. They were all in colours of pink, green, yellow, sky blue and cobalt blue. We were to make use of the blood splatter patterns and concepts we learnt in our previous lesson to create a crime scene and let our classmates analyse what exactly happened while the crime was taking place.
Firstly, we set up OUR group's crime scene near the sink and the mirror. This was the situation:
1.) A girl was in the toilet, standing in front of the mirror and sink grooming herself.
2.) She was oblivious to the fact that danger was lurking and a psycho killer was lurking around the corner.
3.) The psycho corner stepped into the toilet and started pacing towards her with a knife behind his back.
4.) The girl heard the guy's footsteps coming and she turns to her right and is shocked to see the guy.
5.) The guy advances towards her, whips out a knife from the back and slashes her from his right to his left in an upwards motion.
6.) Girl hurls body in the direction of the sink and mirror and kneels down on her knees due to immense pain, palms clutch onto wound due to great pain and then palms clutch onto the sink for support.
7.) Wound's blood smudges against the sink while girl kneels onto ground and thus smudges are created at the front of the sink.
8.) Wound's blood drips down tremendously causing a pool of blood to be gathered onto the ground.
9.) Slash blood splatter seen on sink and mirror.
Next, the OTHER group set up their crime scene and we were given the task to analyse the scene. This was what we came up with:
1.) Firstly, we think that the murderer grabbed the victim by the head and slammed her head into the wall, causing a big patch of blood to be formed on the wall, with blood dripping down to the ground.
2.) Then, the murderer grabbed the victim by the head once more and slammer her head into the wall, causing another big patch of blood to be formed on the wall, with blood ALSO dripping down to the ground. (initially, we thought that there may be another person involved since the blood colours used for the 2 blood splatters are different (yellow and blue), however we could not find any possible explanation for the other blood splatters present which indicated that there were 2 people injured, thus, we scraped the idea that 2 people were involved in the crime.)
3.) Judging by the position of the two blood splatters (for the head slams), we conclude that the victim was probably a short and petite person (most likely a girl) because the height of the blood splatter for the head slams was at a low height from the ground, probably around 1.4m.
4.) The girl was semiconscious and thus fell down and sat on the floor with a pool of blood on the ground.
5.) There were a few smudges around the pool of blood, indicating that the girl attempted to stand up to escape/ fight back. Especially since from the front there were two smudges pointing outwards, which may be caused by the legs of the victim.
Then they revealed the actual scenario to us!
1.) The guy got raped by the girl and out of anger, violence, the guy grabs and slams the girl's head into the wall. He slams the girl's head once more creating two blood splatters.
2.) Girl becomes unconscious and falls to the ground, the pool of blood is gathered on the ground from the blood dripping from the wall.
Using the concepts we learnt, the angle and direction of impact, the height of impact of the blood, the velocity of the impact and surface of impact, we interpreted the whole situation and matched our analysis to the actual scenario. For our group, it was mainly involving the observation of the shape of the blood pool and the direction at which the blood flows to. There was also blood dripping on blood, which indicates excess bleeding and a serious injury being sustained-> head injury. The small little blood splatters around the big patch of blood on the wall also indicates that the impact was huge and thus the force exerted by the murdered when slamming the victim's head against the wall, was large too.
PHOTOS + VIDEOS:
 |
| The blood splatters our group made :) Slash blood splatter, handprint and smudge marks are on the upper mahjong paper while the dripping blood is on the lower mahjong paper. |
 |
| Slash blood splatter and handprint. Smudge mark of the wound can be seen at the lower part of the mahjong paper. |
 |
| The dripping blood from the wound. |
 |
| Dripping blood from the wound up close. |
 |
| The bloody handprint made on the sink after clutching onto bloody wound. |
 |
| Slash blood splatter, handprints, and smudge marks :) |
 |
| An example of how we described our scenario to the class on foolscap through depictions :P |
Thursday, 2 August 2012
Seventh CSI Lesson: Blood Identification
Blood identification is very essential in crime scene investigation as it helps to identify and match the blood samples with the different suspects, culprits and victimes, thus providing more information to the police for them to crack and solve the case.
Firstly, the context was set:
A man was murdered in the loading bay of a dance club and at the crime scene there were red stains all over: bottles of chili sauce, tomato sauce, fruit juice and dyes. The police were unable to identify which were the blood stains and thus had to bring back all the samples of these stains for blood identification.
There are simple tests used to identify blood:
1.) Add benzidine to a solution made from dried blood and water. The solution turns blue or in the case of luminol, glow in the dark! :) In the lab, we used luminol.
Basic idea of luminol: reveal traces of blood with light-producing chemical reaction between several chemicals and hemoglobin in the blood. The molecules break down and the atoms rearrange to form different molecules. In this reaction, the original molecules have more energy than the products (the resulting molecules). The molecules get rid of the extra energy in the form of visible light photons. This process, is generally known as chemiluminescence, which is the same phenomenon that makes fireflies and light sticks glow.
2.) Kastle-Meyer test uses a substance called phenolphthalein, which is normally colourless, but turns pink in the presence of blood.
Usually, this is how the test is carried out.
A drop of phenolphthalin reagent is added to the sample, and after a few seconds, a drop of hydrogen peroxide is applied to the swab. Sometimes the swab is first treated with a drop of ethanol in order to break open the cells that are present, resulting in increased sensitivity and specificity. This test is nondestructive to the sample, which can then be kept and used in further tests at the lab, such as in DNA analysis. If the swab turns pink right away, it is said to test positive for blood.
However, this test result is presumptive positive. In other words, it is not a conclusive test for blood. Other analyses would be carried out to confirm the presence of blood. This is one thing to note: waiting for a period of time over 30 seconds will result in most swabs turning pink naturaly as they oxidise on their own in the air. Some chemicals and biological fluids that DO NOT contain blood can also cause the colour change. Thus, these substances have to be avoided because they produce false positive results= positive result (colour change) in ABSENCE of blood.
How does this test work?
The Kastle-Meyer test relies on the iron in hemoglobin in the blood to promote the oxidation of phenolphthalin to phenolphthalein. phenolphTHALIN is colourless, but in the presence of blood and hydrogen peroxide, it changes to phenolphTHALEIN, which makes the solution pink.
3.) Add hydrogen peroxide to the blood sample. It will bubble profusely.
Why does it foam/ bubble profusely?
Blood and cells contain an enzyme called catalase. Since a cut or scrape contains both blood and damaged cells, there is lots of catalase present. When the catalase comes in contact with hydrogen peroxide, it turns the hydrogen peroxide into water and oxygen gas.
Catalase does this extremely efficiently-- up to 200 000 reactions per second :O The bubbles seen in the foam are pure oxygen bubbles being created by the catalase. Putting a little hydrogen peroxide on a cut potato will also achieve the same result because catalase in the damaged potato cells reacts with the hydrogen peroxide. Hydrogen peroxide does not foam in the bottle or on skin because there is no catalase to help the reaction to occur. It is stable at room temperature.
We were given 6 different samples to test for blood. Firstly, before we carried out the blood detection test for the first test, we had to fill in our predictions for the samples. After which, we carried out our results and these were our results:
The samples tested positive for catalase: 4, 5 and 6
Next, we proceeded onto test 2 using the samples tested positive in the previous test. We were given filter papers and luminol spray. We dripped 2 drops onto filter papers for each sample. Then we placed the filter paper in the open cupboard of our lab bench, where it is darker and we sprayed luminol onto the filter paper. The bluish glow was then observed.
Samples that glow/s in the luminol test: 4 and 5.
Following that, the third test was used to test for the presence of blood for the samples that glowed in the previous test. We were again given filter papers and this time, the Kastle-Meyer Reagent also. We dripped 2 drops of samples onto filter papers individually and 4 drops of Kastle-Meyer Reagent onto each filter paper for each sample. Then, we had to wait 3 minutes and record our observation. After waiting to ensure that no colour develops at this stage (because there may be other external factors that cause the colour change), add two drops of 3% hydrogen peroxide. An intense pink colour is positive test for peroxidise activity, indicative of hemoglobin and thus, blood.
OBSERVATION: SAMPLE 4 TURNED INTENSE PINK :)
sample5 only turned a very light pink!
CONCLUSION: SAMPLE 4 IS BLOOD!!!
sample 5 had a colour change maybe due to other factors such as the presence of other chemicals/ oxidisation that causes the light pink colour to be obtained.
PHOTOS:
QUESTIONS:
Why is it necessary to use more than one test to determine whether the given stain is blood?
These tests are presumptive tests. We cannot conclude directly and accurately based on only just 1 test but we can eliminate the other samples to obtain the final sample that is BLOOD. For example: test 2 is a presumptive test, we would need to carry out other analyses to confirm the presence of blood.
Once you know that a stain is real blood, what else would you do as a forensic scientist?
I would carry out a DNA test to test if the blood matches with suspects or victims. I would also check if it is human/ animal blood.
With these tests to detect presence of blood, it would be very useful to the forensic scientists as they are able to carry out blood comparison analysis, etc. and aid in progress of the police's work in crime scene investigation.
Firstly, the context was set:
A man was murdered in the loading bay of a dance club and at the crime scene there were red stains all over: bottles of chili sauce, tomato sauce, fruit juice and dyes. The police were unable to identify which were the blood stains and thus had to bring back all the samples of these stains for blood identification.
There are simple tests used to identify blood:
1.) Add benzidine to a solution made from dried blood and water. The solution turns blue or in the case of luminol, glow in the dark! :) In the lab, we used luminol.
Basic idea of luminol: reveal traces of blood with light-producing chemical reaction between several chemicals and hemoglobin in the blood. The molecules break down and the atoms rearrange to form different molecules. In this reaction, the original molecules have more energy than the products (the resulting molecules). The molecules get rid of the extra energy in the form of visible light photons. This process, is generally known as chemiluminescence, which is the same phenomenon that makes fireflies and light sticks glow.
2.) Kastle-Meyer test uses a substance called phenolphthalein, which is normally colourless, but turns pink in the presence of blood.
Usually, this is how the test is carried out.
A drop of phenolphthalin reagent is added to the sample, and after a few seconds, a drop of hydrogen peroxide is applied to the swab. Sometimes the swab is first treated with a drop of ethanol in order to break open the cells that are present, resulting in increased sensitivity and specificity. This test is nondestructive to the sample, which can then be kept and used in further tests at the lab, such as in DNA analysis. If the swab turns pink right away, it is said to test positive for blood.
However, this test result is presumptive positive. In other words, it is not a conclusive test for blood. Other analyses would be carried out to confirm the presence of blood. This is one thing to note: waiting for a period of time over 30 seconds will result in most swabs turning pink naturaly as they oxidise on their own in the air. Some chemicals and biological fluids that DO NOT contain blood can also cause the colour change. Thus, these substances have to be avoided because they produce false positive results= positive result (colour change) in ABSENCE of blood.
How does this test work?
The Kastle-Meyer test relies on the iron in hemoglobin in the blood to promote the oxidation of phenolphthalin to phenolphthalein. phenolphTHALIN is colourless, but in the presence of blood and hydrogen peroxide, it changes to phenolphTHALEIN, which makes the solution pink.
3.) Add hydrogen peroxide to the blood sample. It will bubble profusely.
Why does it foam/ bubble profusely?
Blood and cells contain an enzyme called catalase. Since a cut or scrape contains both blood and damaged cells, there is lots of catalase present. When the catalase comes in contact with hydrogen peroxide, it turns the hydrogen peroxide into water and oxygen gas.
Catalase does this extremely efficiently-- up to 200 000 reactions per second :O The bubbles seen in the foam are pure oxygen bubbles being created by the catalase. Putting a little hydrogen peroxide on a cut potato will also achieve the same result because catalase in the damaged potato cells reacts with the hydrogen peroxide. Hydrogen peroxide does not foam in the bottle or on skin because there is no catalase to help the reaction to occur. It is stable at room temperature.
We were given 6 different samples to test for blood. Firstly, before we carried out the blood detection test for the first test, we had to fill in our predictions for the samples. After which, we carried out our results and these were our results:
 |
| Table of results for first test :) |
Next, we proceeded onto test 2 using the samples tested positive in the previous test. We were given filter papers and luminol spray. We dripped 2 drops onto filter papers for each sample. Then we placed the filter paper in the open cupboard of our lab bench, where it is darker and we sprayed luminol onto the filter paper. The bluish glow was then observed.
Samples that glow/s in the luminol test: 4 and 5.
Following that, the third test was used to test for the presence of blood for the samples that glowed in the previous test. We were again given filter papers and this time, the Kastle-Meyer Reagent also. We dripped 2 drops of samples onto filter papers individually and 4 drops of Kastle-Meyer Reagent onto each filter paper for each sample. Then, we had to wait 3 minutes and record our observation. After waiting to ensure that no colour develops at this stage (because there may be other external factors that cause the colour change), add two drops of 3% hydrogen peroxide. An intense pink colour is positive test for peroxidise activity, indicative of hemoglobin and thus, blood.
OBSERVATION: SAMPLE 4 TURNED INTENSE PINK :)
sample5 only turned a very light pink!
CONCLUSION: SAMPLE 4 IS BLOOD!!!
sample 5 had a colour change maybe due to other factors such as the presence of other chemicals/ oxidisation that causes the light pink colour to be obtained.
PHOTOS:
 |
| Lots of bubbling in sample 4 on the right. Small amount of bubbling in sample 5 on the left :) |
 |
| Sample 4 glowing in the dark after luminol was sprayed :) |
 |
| Reduced phenophthalein! |
 |
| Sample 5- light pink! |
QUESTIONS:
Why is it necessary to use more than one test to determine whether the given stain is blood?
These tests are presumptive tests. We cannot conclude directly and accurately based on only just 1 test but we can eliminate the other samples to obtain the final sample that is BLOOD. For example: test 2 is a presumptive test, we would need to carry out other analyses to confirm the presence of blood.
Once you know that a stain is real blood, what else would you do as a forensic scientist?
I would carry out a DNA test to test if the blood matches with suspects or victims. I would also check if it is human/ animal blood.
With these tests to detect presence of blood, it would be very useful to the forensic scientists as they are able to carry out blood comparison analysis, etc. and aid in progress of the police's work in crime scene investigation.
Wednesday, 1 August 2012
Sixth CSI Lesson: Blood Splatter!
In this lesson, we learnt about blood splatter. We learnt that the pattern left by falling or projected drops of blood can help investigators determine where and how a crime took place. Thus, it is important to examine the blood drops and stains closely and detailedly.
Firstly, we learnt about height of impact. As a drop of blood falls through the air, it accelerates and theoretically, the greater the height, the greater the speed of the blood upon impact, and hence the larger the diameter of the blood stain.
This is the equation to calculate vertical distance travelled by the blood
s= ut + 1/2 at^2
s= vertical distance travelled by the blood
u= initial speed of the blood
a= acceleration due to free fall (9.8ms^-2)
t= time taken for the blood to reach the point of impact
Firstly we carried out the first experiment to see if the vertical distance really does affect the diameter of the blood stains obtained. We attached an A4 sized paper onto the clipboard and placed it on a surface. Then, we clamped the dropper to the retort stand 10 cm above the paper on the clipboard.
Next, squeeze a drop of blood to the paper below and measure the diameter of the blood drop. Repeat this to obtain 2 results and from there get the average diameter. Repeat the above steps for vertical distances: 30, 60, 100 and 150. Following that, record results in table form.
Our results showed that the greater the vertical distance, the greater the diameter of the blood stain. These were our results:
Then, we had to carry out a second experiment which was regarding the angle and direction of impact of the blood stains. We were first given some information on the angle and direction of impact in the worksheet.
Angle of impact- acute angle that is formed between the direction of the blood drop and the surface it strikes-> this is used to determine the area of convergence and area of origin.
ANGLE OF IMPACT (on flat surface) CAN BE CALCULATED BY MEASURING LENGTH AND WIDTH OF STAIN.
For example: when a droplet of blood falls to the surface at 90 degrees, bloodstain will be circular and it will be more elliptical when angle of impact increases.
elliptical- egg-shaped, rounded like an egg :0 haha.
Calculation of angle of impact:
i= sin^-1 W/L
We had to take some precautions before carrying out the experiment. For example: we had to take note that when measuring the length, L and the width, W of a stain, no part of hte spines, tails or satellite splatter are included in the measure.
Firstly, we attached A4 paper to the clipboard and placed it on the floor. Then clamp the dropper to the retort stand and place it at least 100cm above the surface of the paper. Elevate the clipboard to 10 degrees and squeeze one drop of blood onto the paper. Then, measure and record length and width. (Don't forget to label the stain- miss siow always emphasises HAHA) Repeat these steps for the other angles: 40 and 70 degrees.
Based on our results, we have concluded that the higher the angle of elevation, the lesser the angle of impact.
There were also other knowledge gained such as the velocity of impact of the blood and the surface of impact of the blood. Blood that drops on a smooth surface (smooth edges) would look different from blood that drops on a rough surface (more jagged edges)
Overall, i felt that this was quite a useful and beneficial session of CSI because i never knew that the way the blood stains were positioned or how they looked like could tell us so much about what happened at the crime scene. It gave me a more insightful outlook to this topic about blood splatter in the CSI module and it urges me to learn more as i believe that as mentioned in the first lesson, physical evidence speak alot and besides blood splatters, there may also be other evidences that can give us more in-depth and wider vision of the case such as gunshots in human bodies, or post-death changes in the dead bodies after the crime was committed.
PHOTOS:
Firstly, we learnt about height of impact. As a drop of blood falls through the air, it accelerates and theoretically, the greater the height, the greater the speed of the blood upon impact, and hence the larger the diameter of the blood stain.
This is the equation to calculate vertical distance travelled by the blood
s= ut + 1/2 at^2
s= vertical distance travelled by the blood
u= initial speed of the blood
a= acceleration due to free fall (9.8ms^-2)
t= time taken for the blood to reach the point of impact
Firstly we carried out the first experiment to see if the vertical distance really does affect the diameter of the blood stains obtained. We attached an A4 sized paper onto the clipboard and placed it on a surface. Then, we clamped the dropper to the retort stand 10 cm above the paper on the clipboard.
Next, squeeze a drop of blood to the paper below and measure the diameter of the blood drop. Repeat this to obtain 2 results and from there get the average diameter. Repeat the above steps for vertical distances: 30, 60, 100 and 150. Following that, record results in table form.
Our results showed that the greater the vertical distance, the greater the diameter of the blood stain. These were our results:
 |
| Table of results |
Then, we had to carry out a second experiment which was regarding the angle and direction of impact of the blood stains. We were first given some information on the angle and direction of impact in the worksheet.
Angle of impact- acute angle that is formed between the direction of the blood drop and the surface it strikes-> this is used to determine the area of convergence and area of origin.
ANGLE OF IMPACT (on flat surface) CAN BE CALCULATED BY MEASURING LENGTH AND WIDTH OF STAIN.
For example: when a droplet of blood falls to the surface at 90 degrees, bloodstain will be circular and it will be more elliptical when angle of impact increases.
elliptical- egg-shaped, rounded like an egg :0 haha.
Calculation of angle of impact:
i= sin^-1 W/L
We had to take some precautions before carrying out the experiment. For example: we had to take note that when measuring the length, L and the width, W of a stain, no part of hte spines, tails or satellite splatter are included in the measure.
Firstly, we attached A4 paper to the clipboard and placed it on the floor. Then clamp the dropper to the retort stand and place it at least 100cm above the surface of the paper. Elevate the clipboard to 10 degrees and squeeze one drop of blood onto the paper. Then, measure and record length and width. (Don't forget to label the stain- miss siow always emphasises HAHA) Repeat these steps for the other angles: 40 and 70 degrees.
Based on our results, we have concluded that the higher the angle of elevation, the lesser the angle of impact.
There were also other knowledge gained such as the velocity of impact of the blood and the surface of impact of the blood. Blood that drops on a smooth surface (smooth edges) would look different from blood that drops on a rough surface (more jagged edges)
Overall, i felt that this was quite a useful and beneficial session of CSI because i never knew that the way the blood stains were positioned or how they looked like could tell us so much about what happened at the crime scene. It gave me a more insightful outlook to this topic about blood splatter in the CSI module and it urges me to learn more as i believe that as mentioned in the first lesson, physical evidence speak alot and besides blood splatters, there may also be other evidences that can give us more in-depth and wider vision of the case such as gunshots in human bodies, or post-death changes in the dead bodies after the crime was committed.
PHOTOS:
 |
| Measuring the vertical distance |
 |
| The blood given to us |
 |
| Our blood splatters :) |
Fifth lesson: Chromatography!
For this lesson, we learnt about chromatography and its importance in forensic investigation. It is defined as "a physical separation method in which the components of a combination are separated by differences in their distribution between two phases, one of which is stationary while the other moves through it in a definite direction".
I have also learnt that there are different chromatographic processes available: gas chromatography, liquid chromatography, ion exchange chromatography, and affinity chromatography.
Ion exchange chromatography- a process that allows separation of ions and polar molecules based on their charge
Affinity chromatography- method of separating biochemical mixtures and based on a highly specific interaction such as that between antigen and antibody, enzyme and substrate.
For this lesson, we are carrying out paper chromatography with ink.
Firstly, the scenario was set:
We were given a cheque and some of the numbers at the top right corner of the cheque were forged. We were tasked to find out which digits were forged using chromatography.
We were given the cheque and a few strips of paper. Firstly, we had to draw the line which indicates the place at which we dropped our solute, using a pencil. Then, we cut out small pieces of paper with the digits individually and tried to extract the ink by using the tip of a dropper to poke the ink out of the small piece of paper in a very very tiny container containing a drop of water. Next, using the capillary tube, we obtained the ink from the container and dripped 2 drops on the starting line (pencil drawn). We then inserted the strip of paper into a boiling tube filled with approximately 2cm cube of water. The strip of paper was then left alone. We repeated the whole procedure for the rest of the digits and eventually, we found out that digits 4 and 7 were the forged ones.
This is because, based on the chromatography obtained, there different colours appeared on the chromatography, for example: the colour pink was present on the chromatographies of digits 4 and 7 but not on the rest. However, this is not the only way in which the conclusion can be made. We can also calculate the r.f values and see which chromatography(ies) has the most differing value(s). :)
Overall, i feel that chromatography can be very useful in forensic investigation because for example: similar to the scenario given, the police can find out if any legal documents are forged using the method of chromatography.
Generally, chromatography can be used to determine what is in a mixture. For example: when people go in for drug tests, their urine may be analysed using chromatography to determine if they have drugs or drug byproducts in their urine. In forensic pathology, a sample may be analysed to determine what chemicals are present in the dead body and possibly indicate if there is a poisonous substance present that may have killed them, or whether they were on drugs/ drunk when they died. Moreover, it is also possible that chromatography is used to analyse samples taken from crime scenes to find out if any unusual substances are present that might indicate where something came from or where someone may have been prior to entering the crime scene. At airports it can be used to detect minute traces of explosives!!
Thus, i felt that this whole lesson was very beneficial and it actually got me thinking about whether i was interested in the area of forensic science in the future :P hehe.
Photos:
 |
| Drawing the lines! |
 |
| Digit in the small container, and ink getting extracted |
 |
| Using the capillary tube to extract ink from small container |
 |
| The strips of paper left in the boiling tubes filled with a little water |
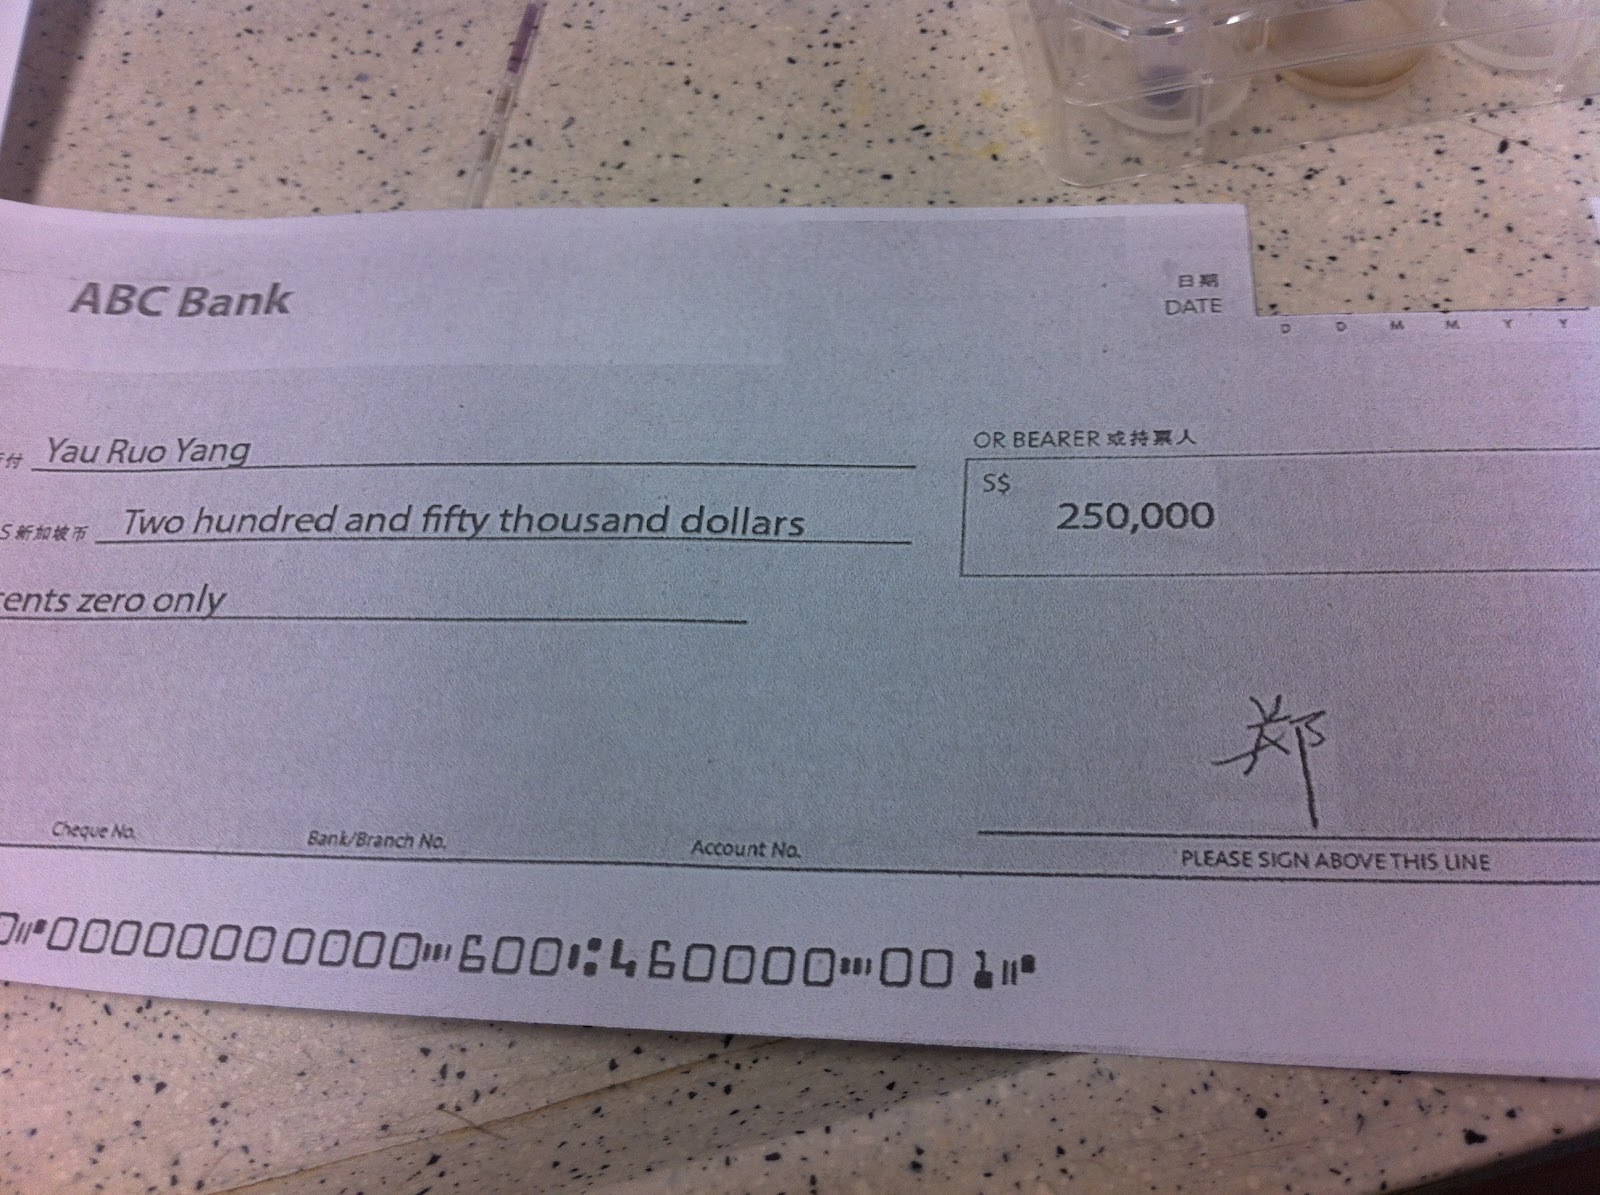 |
| The cheque with the cut out digits! |
Saturday, 28 July 2012
Fourth CSI Lesson :)
For this lesson, we did the flame test. However, before we started any hands-on activities, we were given a handout to teach us about the background knowledge of flame test.
Background on flame test:
Metals change the colour of a flame when they are heated in it. Different metals give different colours to the flame, so flame tests can be used to identify the presence of a particular metal in a sample.
Every atom consists of a nucleus with tiny electrons whizzing around it. The further away from the nucleus they are, the more energy the electrons have. If a metal atom is heated, the electrons closer to the nucleus may gain enough energy to orbit further away from the nucleus. When they fall back closer to the nucleus, they give off this extra energy as light.
Next, we moved on to the practical part of the lesson. We were given a bunsen burner, a metal loop, lab glasses, and powdered samples of: barium, lead, calcium, potassium, copper and sodium. We were to observe the light emitted when putting these powdered samples into the flame using the bunsen burner and the metal loop.
We stuck the metal loop into the containers of powdered samples and took out a little powder. Then we put the metal loop in the flame and different colours were emitted. These were our results:

On the worksheet given, we were also given some questions as food for thought:
1.) How and what is it used for in "Crime scene investigations/ forensic science?"
2.) Is flame test sufficient to identify the trace metal(s) present?
3.) If there are more than one trace metal present, is the flame test still a suitable technique to identify the trace metals?
1.) Flame analysis is based on the physical and chemical principle that atoms after being heated by flame turn to their normal energy state by giving off the excess energy in the form of light. Frequencies of light given off are characteristic for each element. Flame analysis is a qualitative test and is designed to identify the components of a substance or mixture. Quantitative tests measure the amounts of the components in a reaction or substance. The unknown to be subjected to flame analysis is either sprayed into the flame or placed on a thin metal loop, then put into the flame. Volatile elements produce intense colours. For example: sodium, it produces a very bright yellow colour.
However, as useful as it is to forensic analysis, the flame test does not work on all elements.
2.) I don't think the flame test is sufficient to identify the trace metal(s) present because everyone perceives colours differently. If the flame given out seems red to me, it may seem bright orange to another person, so i think that the flame test is insufficient to identify the trace metals because everyone has different perceptions of colours and it will be inaccurate to just identify the trace metals by observing the light emitted by the metal. -> this is my opinion, may not be true though!
Moreover, impurities or contaminants may affect the test results. Sodium, in particular, is present in most compounds and will colour the flame. Sometimes a blue glass is used to filter out the yellow of sodium.
3.) If there are more than one trace metal present, is the flame test still a suitable technique to identify the trace metals?
No, the test cannot differentiate between all elements. Several metals produce the same flame colour. Some compounds do not change the colour of the flame at all.
This is a detailed interpretation of the flame test:
Red
Carmine to Magenta: Lithium compounds. Masked by barium or sodium.
Scarlet or Crimson: Strontium compounds. Masked by barium.
Red: Rubidium (unfiltered flame)
Yellow-Red: Calcium compounds. Masked by barium.
Carmine to Magenta: Lithium compounds. Masked by barium or sodium.
Scarlet or Crimson: Strontium compounds. Masked by barium.
Red: Rubidium (unfiltered flame)
Yellow-Red: Calcium compounds. Masked by barium.
Yellow
Gold: Iron
Intense Yellow: Sodium compounds, even in trace amounts. A yellow flame is not indicative of sodium unless it persists and is not intensified by addition of 1% NaCl to the dry compound.
Gold: Iron
Intense Yellow: Sodium compounds, even in trace amounts. A yellow flame is not indicative of sodium unless it persists and is not intensified by addition of 1% NaCl to the dry compound.
White
Bright White: Magnesium
White-Green: Zinc
Bright White: Magnesium
White-Green: Zinc
Green
Emerald: Copper compounds, other than halides. Thallium.
Bright Green: Boron
Blue-Green: Phosphates, when moistened with H2SO4 or B2O3.
Faint Green: Antimony and NH4 compounds.
Yellow-Green: Barium, manganese(II), molybdenum.
Emerald: Copper compounds, other than halides. Thallium.
Bright Green: Boron
Blue-Green: Phosphates, when moistened with H2SO4 or B2O3.
Faint Green: Antimony and NH4 compounds.
Yellow-Green: Barium, manganese(II), molybdenum.
Blue
Azure: Lead, selenium, bismuth, cesium, copper(I), CuCl2 and other copper compounds moistened with hydrochloric acid, indium, lead.
Light Blue: Arsenic and come of its compounds.
Greenish Blue: CuBr2, antimony
Azure: Lead, selenium, bismuth, cesium, copper(I), CuCl2 and other copper compounds moistened with hydrochloric acid, indium, lead.
Light Blue: Arsenic and come of its compounds.
Greenish Blue: CuBr2, antimony
Purple
Violet: Potassium compounds other than borates, phosphates, and silicates. Masked by sodium or lithium.
Lilac to Purple-Red: Potassium, rubidium, and/or cesium in the presence of sodium when viewed through a blue glass.
Violet: Potassium compounds other than borates, phosphates, and silicates. Masked by sodium or lithium.
Lilac to Purple-Red: Potassium, rubidium, and/or cesium in the presence of sodium when viewed through a blue glass.
PHOTOS+VIDEOS:
 |
| The powdered samples! :) |
 |
| Bunsen burner and lighter! |
 |
| Barium nitrate |
Flame test of sodium
Subscribe to:
Comments (Atom)